
You may not use glman for this project.
This page was last updated: February 11, 2025
| 
|
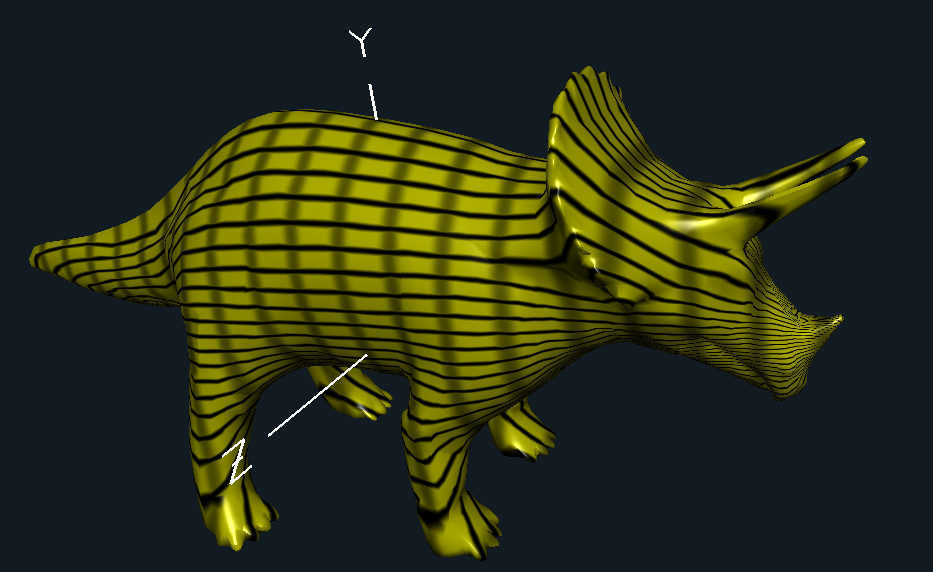
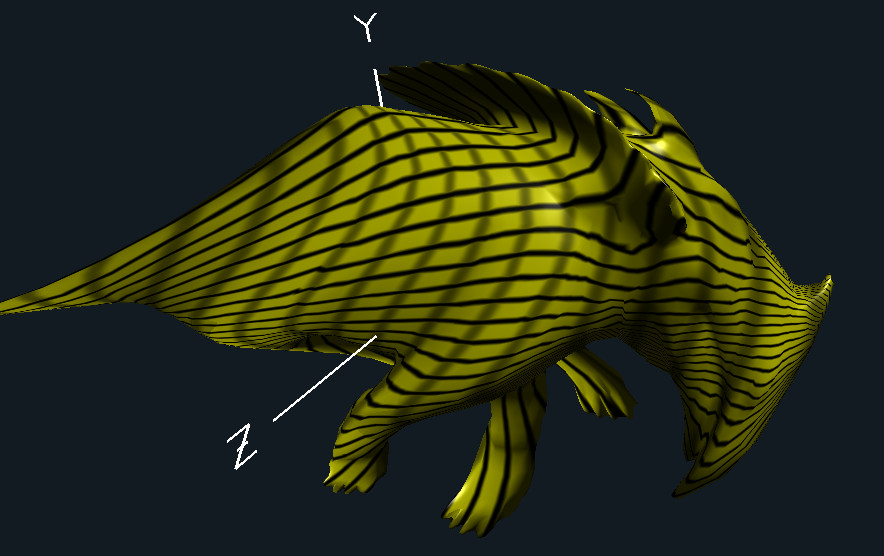
| Twisted | Twisted about Y |
The goal of this project is to twist an OBJ-defined object.
What is twisting anyway? "Twisting" is a rotation about an axis where the angle of rotation is proportional to the distance away from that axis. Half the object is getting a positive twist while the other half is getting a negative twist. (See the video for an example.) Think of twisting a dishrag.
Use Canvas to turn in your:
Submissions are due at 23:59:59 on the listed due date.
#define MS_PER_CYCLE	10000
. . .
int ms = glutGet( GLUT_ELAPSED_TIME );
ms %= MS_PER_CYCLE;
Time = (float)ms / (float)MS_PER_CYCLE;		// [0.,1.)
Then, in Display( ), convert whatever you did into an amount of twisting to apply and send that over to your vertex shader as a uniform variable.
In InitGraphics( ):
glGenLists( 1, &MyObjectList );
glNewList( MyObjectList, GL_COMPILE );
	LoadObjFile( (char *)"dino.obj" );
glEndList( );
In Display( ):
float twist = ?????;
Pattern.Use( );
Pattern.SetUniformVariable( "uTwist", twist );
glCallList( MyObjectList );
Pattern.UnUse;
This code goes in the vertex shader:
vec3
RotateX( vec3 xyz, float radians )
{
	float c = cos(radians);
	float s = sin(radians);
	vec3 newxyz = xyz;
	newxyz.yz = vec2(
		dot( xyz.yz, vec2( c,-s) ),
		dot( xyz.yz, vec2( s, c) )
	);
	return newxyz;
}

vec3
RotateY( vec3 xyz, float radians )
{
	float c = cos(radians);
	float s = sin(radians);
	vec3 newxyz = xyz;
	newxyz.xz =vec2(
		dot( xyz.xz, vec2( c,s) ),
		dot( xyz.xz, vec2(-s,c) )
	);
	return newxyz;
}

vec3
RotateZ( vec3 xyz, float radians )
{
	float c = cos(radians);
	float s = sin(radians);
	vec3 newxyz = xyz;
	newxyz.xy = vec2(
		dot( xyz.xy, vec2( c,-s) ),
		dot( xyz.xy, vec2( s, c) )
	);
	return newxyz;
}
Get ideas from the Stripes, Rings, and Dots noteset. Some of this might help you. (or not...)
in vec2  vST;
in vec3  vMC;

float
SmoothPulse( float left, float right,   float value, float tol )
{
	float t =	smoothstep( left-tol,  left+tol,  value )  -
			smoothstep( right-tol, right+tol, value );
	return t;
}


// in main( ):
	float numin? = int( ??? / ??? );
	float ?c = numin?*??? + ???/2.;
	float tp = SmoothPulse( ???, ???, ???, ??? );

	vec3 myColor = mix( ???, ???, tp );
	vec3 mySpecularColor = vec3( 1.0, 1.0, 1.0 );
	. . .
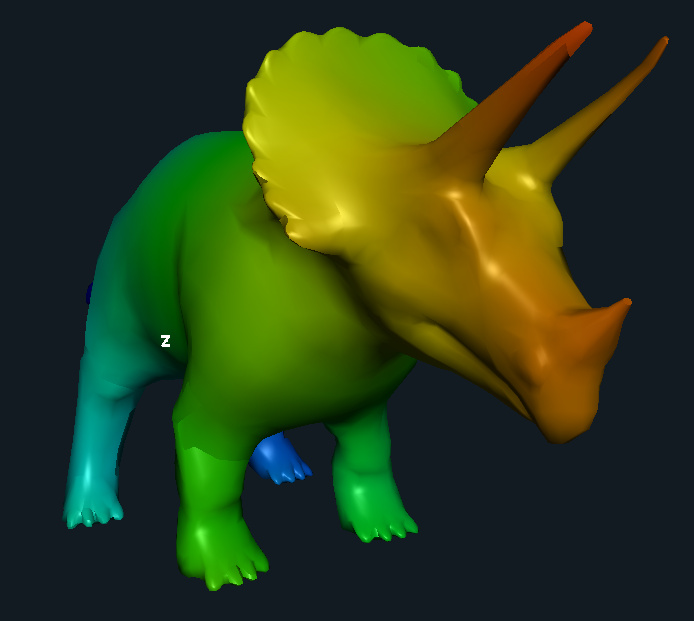
Add a ChromaDepth feature that colors the scene by eye coordinate depth: Red in the front, Blue in the back, and Green in the middle. Include an option which turns the use of ChromaDepth on and off.
I have glasses which will use the ChromaDepth colors to make your scene look really 3D, although you (and we) will know if it is working without having the glasses. Please do not touch the plastic lenses on the glasses. Human fingerprints are nearly impossible to get off them.
uRedDepth and uBlueDepth are meant to be the Z depths in eye coordinates at which the ChromaDepth color interpolation starts and ends. You can make these variable, or you can hardcode them if you find good values for them.
Add some new uniform variables in the fragment shader:
uniform float	uRedDepth, uBlueDepth;
uniform bool	uUseChromaDepth;
You will need to set those uniform variables:
	uUseChromaDepth < false >     \
        uBlueDepth <0. 4.4 10.>       \
        uRedDepth  <0. 1. 5.>
Then, in the vertex shader:
out float	vZ;
. . .
	vZ = -ECposition.z;
Then, in the fragment shader:
in float                vZ;
. . .
vec3
Rainbow( float t )
{
        t = clamp( t, 0., 1. );         // 0.00 is red, 0.33 is green, 0.67 is blue

        float r = 1.;
        float g = 0.0;
        float b = 1.  -  6. * ( t - (5./6.) );

        if( t <= (5./6.) )
        {
                r = 6. * ( t - (4./6.) );
                g = 0.;
                b = 1.;
        }

        if( t <= (4./6.) )
        {
                r = 0.;
                g = 1.  -  6. * ( t - (3./6.) );
                b = 1.;
        }

        if( t <= (3./6.) )
        {
                r = 0.;
                g = 1.;
                b = 6. * ( t - (2./6.) );
        }

        if( t <= (2./6.) )
        {
                r = 1.  -  6. * ( t - (1./6.) );
                g = 1.;
                b = 0.;
        }

        if( t <= (1./6.) )
        {
                r = 1.;
                g = 6. * t;
        }

        return vec3( r, g, b );
}

. . .

        vec3 myColor = ?????
        vec3 mySpecularColor = vec3( 1.0, 1.0, 1.0 );

        if( uUseChromaDepth )
        {
                float t = (2./3.) * ( abs(vZ) - uRedDepth ) / ( uBlueDepth - uRedDepth );
                t = clamp( t, 0., 2./3. );
                myColor = Rainbow( t );
        }
If you do the ChromaDepth extra credit, you must show us that the red-to-blue color pattern is always in Eye Coordinates. That is, no matter how you rotate the scene, red is always in front and blue is always in back.
If you want to see more ChromaDepth examples, click here.
If you ever want to buy your own ChromaDepth glasses, go here.
| Item | Points |
| Using an OBJ file | 10 |
| Correct per-fragment lighting (we look for the bright spot) | 20 |
| Some sort of stripe-ish hatching done procedurally (not a texture, not ellipses) | 30 |
| Some sort of twisting of the object | 10 |
| Animation of the twisting | 30 |
| Extra Credit | 5 |
| Potential Total | 105 |