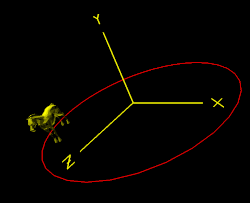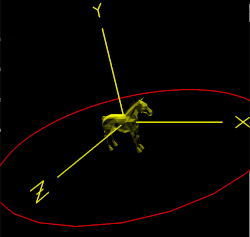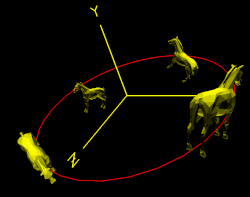

This page was last updated: July 27, 2025

You don't have to be a kid to enjoy a ride on a carousel. (Also called a Merry-Go-Round.) But, you do have to understand computer graphics transformations to animate one. That's where you come in.
When you are done with this assignment, you will understand how to compound transformations to make the motion of some objects depend on the motion of other objects. This is a key for creating many of the typical animated scenes you see in games and movies.


Remember how we did it in class: write down in words what transformations you want to have happen and then program it backwards. If you have a stuffed animal handy, you might imagine a set of axes on it and then figure out what motions it would need to have to act like a carousel horse.
	WireHorseList = glGenLists( 1 );
	glNewList( WireHorseList, GL_COMPILE );
		glPushMatrix( );
			glRotatef(90.f, 0., 1., 0.);
			glTranslatef( 0., -1.1f, 0.f);
			glColor3f( 1.f, 1.f, 0.f);	// yellow
			glBegin( GL_LINES );
				for( int i=0; i < HORSEnedges; i++ )
				{
					struct point p0 = HORSEpoints[ HORSEedges[i].p0 ];
					struct point p1 = HORSEpoints[ HORSEedges[i].p1 ];
					glVertex3f( p0.x, p0.y, p0.z );
					glVertex3f( p1.x, p1.y, p1.z );
				}
			glEnd( );
		glPopMatrix( );
	glEndList( );
	SolidHorseList = glGenLists( 1 );
	glNewList( SolidHorseList, GL_COMPILE );
		glPushMatrix( );
			glRotatef(90.f, 0., 1., 0.);
			glTranslatef( 0., -1.1f, 0.f);
			glBegin( GL_TRIANGLES );
				for( int i = 0; i < HORSEntris; i++ )
				{
					struct point p0 = HORSEpoints[ HORSEtris[i].p0 ];
					struct point p1 = HORSEpoints[ HORSEtris[i].p1 ];
					struct point p2 = HORSEpoints[ HORSEtris[i].p2 ];

					// fake "lighting" from above:

					float p01[3], p02[3], n[3];
					p01[0] = p1.x - p0.x;
					p01[1] = p1.y - p0.y;
					p01[2] = p1.z - p0.z;
					p02[0] = p2.x - p0.x;
					p02[1] = p2.y - p0.y;
					p02[2] = p2.z - p0.z;
					Cross( p01, p02, n );
					Unit( n, n );
					n[1] = (float)fabs( n[1] );
					// simulating a glColor3f( 1., 1., 0. ) = yellow:
					glColor3f( 1.f*n[1], 1.f*n[1], 0.f*n[1]);

					glVertex3f( p0.x, p0.y, p0.z );
					glVertex3f( p1.x, p1.y, p1.z );
					glVertex3f( p2.x, p2.y, p2.z );
				}
			glEnd( );
		glPopMatrix( );
	glEndList( );
In the glColor3f( ) call, take whatever R, G, B triple you want the horse to have and scale them all by n[1]. In the above example, this is how you get yellow.
Each of these two sets of code places the drawing instructions into a display list.
Then, in your Display( ) function, you will call either:
glCallList( WireHorseList );
or:
glCallList( SolidHorseList );
I know that someone will ask if you can use a triceratops instead of a horse. OK, why not? To get the triceratops, #include this file instead: dino.550, It is the same format as the carousel horse file except where there used to be a name HORSE, it is now DINO.
Anticipating what your next question will be, here is cow.550 as well.
This is why I love this job so much!
Not sure where to start? Read on!
Play with these so that when your program starts up, your are seeing the horse and your whole scene from a good angle.
	int ms = glutGet(GLUT_ELAPSED_TIME);
	ms %= MS_PER_CYCLE;				// makes the value of ms between 0 and MS_PER_CYCLE-1
	Time = (float)ms / (float)MS_PER_CYCLE;		// makes the value of Time between 0. and slightly less than 1.
where Time is a global floating-point variable and MS_PER_CYCLE is how many milliseconds are in the animation cycle. The sample code set this to 10000 (10 seconds), but you can change it.
This code sets Time to be between 0. and 1., which you can then use to set animation parameters. The advantage of this is that you will get the same number of milliseconds in the animation cycle regardless of how fast or slow a system you run this on.
The code to light the horse's surfaces uses two functions, Cross( ) and Unit( ). They are in your sample code already.
One thing that has always helped Joe Graphics debug animation programs is to have a "freeze" option, toggled with the 'f' key. This freezes the animation so you can really look at your horse and propellers and see if they are being drawn correctly. Remember what the current freeze status is with a boolean global variable. Set it to false in Reset( ). Then, freezing the animation is just a matter is setting the Idle Function to NULL. To un-freeze it, set the Idle Function back to Animate( ). So, the whole thing could look like this:
// a global:
bool Frozen;


// in Reset( ):
        Frozen = false;


// in Keyboard( ):
	case 'f':
	case 'F':
		Frozen = ! Frozen;
		if( Frozen )
			glutIdleFunc( NULL );
		else
			glutIdleFunc( Animate );
		break;
Use Canvas to turn in your:
| Feature | Points |
|---|---|
| Correctly draw a horse body with the "fake lighting" | 20 |
| The horse moves in a circle correctly | 20 |
| The horse bobs up and down correctly | 20 |
| The horse rocks (pitches) correctly | 20 |
| Able to switch views | 20 |
| Extra Credit: Able to animate 4 horses correctly | 5 |
| Potential Total | 105 |
Thanks to free3d.com for the free horse model!