Getting Started
To allow access to all executables you will need to create an MPEG movie you must add the following to your path:
On HP Lab Machines: ~tgd/cs450/bin
In order to do this, add the statement:
On HP Lab Machines: set path=($path ~tgd/cs450/bin)
to your .cshrc file. Then, you must source your .cshrc file (in order for the changes to take effect in your current login session) by executing the command:
source .cshrc
There are a number of files in the directory you have just added to your path that will help you MPEG encode your animation. They are described below. All of the commands mentioned below should work exactly as specified below after this step is performed. This step must only be performed the first time once.
Preparing Frames
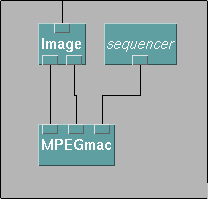
In order to MPEG encode your animation, you need to store your frames in separate files. In order to do this, connect the MPEGmac module in your program as seen below:

In order to download this module, click here. When the window showing the file opens, use the "save as" option to put the file in your directory. Once it is there, move the file to your ".DXmacros" directory so that the macro is loaded into DX automatically upon startup. [If you do not do this before you start DX, the macro will not appear in DX. You can then use the "load macro" option in the DX user interface (under the "File" heading) to load the macro.] A new entry named "Mpeg" will appear in the "Categories" menu of DX. If you select this, you will see "MPEGmac" listed in the tools window. Select this and hook it up as shown in the example above.
The MPEGmac macro will automatically write out the images in your animation in the correct file format and with the correct names. There are a couple of points to be careful about.
Creating an MPEG movie
The script mpeg.script is provided for you in order to help
you create an MPEG movie. The usage syntax for it is:
mpeg.script
This script assumes that the current working directory contains a set
of files created by MPEGmac with the names image.000.rgb,
image.001.rgb, etc. It also assumes that each
rgb file has a corresponding size file
image.000.size etc. These are all written by MPEGmac.
The script then counts the number of such files and constructs a file
called dx.param. This is a parameter file for the MPEG encoder. It
indicates such things as the starting and ending frame file names and
the tradeoff between compression and image quality. The script then
executes a program called mpeg_encode, which will
construct the MPEG file and save it with the name
image.mpg.
Viewing an MPEG Movie
You can view an MPEG animation by typing:
mpeg_play file.mpg.
For example, you can view the ~tgd/cs450/sample.mpg animation on the HP system by typing:
mpeg_play ~tgd/cs450/sample.mpg
Implementation Details
Normally, the process of making an mpeg movie is a little more
complicated. It involves editing a parameter file in which you have
to specify a complex set of parameters as well as describing the file
names of the images and their format. After this, the command
mpeg_encode has to be executed in order to create the MPEG
movie. The program you are using to create your MPEG movie does all
of these steps for you. There is a template parameter file, in which
the values you give as arguments above are automatically inserted.
The file is written out as dx.param, and is then used by
the mpeg_encode command to create your MPEG movie. If you want
to experiment with different MPEG encoding settings, you can edit
dx.param and invoke mpeg_encode yourself using
mpeg_encode dx.param
The MPEGmac macro makes sure that all of the files are written out in a certain format (RGB) and with very specific file names. The file names are important because the parameter file used by the mpeg_encode command as written requires this specific format. This is not required, but makes the process somewhat easier to implement.
Please send any questions or comments to:
Tom Dietterich : tgd@cs.orst.edu